
Adobe Photoshop is a raster graphics editor which is a computer program that allows users to paint and edit pictures interactively on the computer screen developed and published by Adobe Systems for Windows and OS X. I will be using Adobe Photoshop to edit my digi-pak and poster.
It can edit and compose raster images in multiple layers and supports masks, alpha compositing and several color models including RGB, CMYK, Lab color space (with capital L), spot color and duotone.
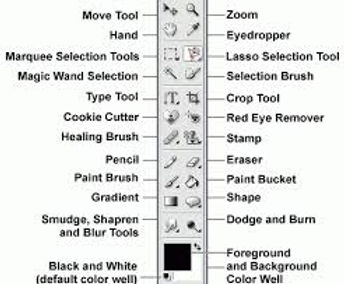
This picture shows us majority of the things we can do on photoshop.
Marquee Tool : The images in Photoshop are stored pixel by pixel, with a code indicating the color of each. The image is just a big mosaic of dots. Therefore, before you can do anything in Photoshop, you first need to indicate which pixels you want to change. The selection tool is one way of doing this. Click on this tool to select it, then click and drag on your image to make a dotted selection box. Hold shift while you drag if you want a perfect square or circle. Any pixels within the box will be affected when you make your next move. If you click and hold on this tool with your mouse button down, you will see that there is also an oval selection shape, and a crop tool.
Crop Tool: To crop your image, draw a box with the crop tool. Adjust the selection with the selection points, and then hit return to crop.
Lasso Tool : The lasso tool lets you select freeform shapes, rather than just rectangles and ovals.
Magic Wand: Yet another way to select pixels is with the magic wand. When you click on an area of the image with this tool, all pixels that are the same color as the pixel you clicked will be selected. Double click on the tool to set the level of tolerance you would like (i.e. how similar in color the pixels must be to your original pixel color. A higher tolerance means a broader color range).
The Move Tool: This is a very important tool, because up until now all you have been able to do is select pixels, and not actually move them. The move tool not only allows you to move areas you have selected, but also to move entire layers without first making a selection. If you hold the option (or alt) key while clicking and dragging with the move tool, you can copy the selection.
Airbrush Paintbrush and Pencil tools can be used to draw with the foreground color on whichever layer is selected. To change the foreground color, double-click on it in the toolbox. You will then see a palette of colors from which to choose. Select one and click OK. To change the brush size, go to Window
Eraser Tool: Erases anything on the selected layer. You can change the eraser size by going to Window
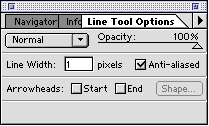
Line Tool: Can be used to draw straight lines. Click on the tool to select it, then click with the tool on the canvas area and drag to draw a line. When you release the mouse button, the line will end. You can change the thickness of the line or add arrowheads to it by double clicking on the tool to see this dialog box:
Text tool: Click on this tool to select it, then click in the Canvas area. You will be given a dialog box in which to type your text, and choose its attributes. Each new block of text goes on its own layer, so you can move it around with the Move Tool: Once you have placed the text, however, it is no longer editable. To correct mistakes, you must delete the old version (by deleting its layer) and replace it.
Eyedropper: Click with this tool on any color in the canvas to make that color the foreground color. (You can then paint or type with it).
Magnifier: Click with this tool on a part of your image you want to see closer, or drag with it to define the area you want to expand to the size of the window. Hold down the Option or Alt key to make it a "reducer" instead and zoom back out.
Grabber: If you click on the grabber it will move the entire page for better viewing.